How to create the perfectly imperfect gallery wall
Last weekend was all about celebrations... Stella + the Stars turned two. I re-read the first ever blog post I wrote feeling a tad nostalgic - you can read it here. It seems so long ago now and so much has happened in the past couple of years but at the same time, in the words of Bastille, if I close my eyes, it almost feels like nothing changed at all... It's been good to realise that two years on, Stella + the Stars mission statement has remained the same and I am still spending most of my days trying to find those quirky items that help you lovely people make your house a (fun) home, without having to sell a limb in the process.
There was another cause for celebrations on Saturday... The first anniversary of our move to the desert. I can barely compute we left our beloved London a year ago, but it also feels like we've been here for, literally, ever. Click here if you are not au fait with our little adventure which started just 12 months ago...

Jumping for joy as Stella + the Stars turns 2 and the living room's gallery wall is finally done (photography: Karen Wandrag from DesignK)
And as if this wasn't enough good news, we also raised an extra glass of bubbles to a really nice Instagram milestone (@stellaandthestars gained its 10,000th follower earlier this month). It's certainly not a big number in the grand scheme of insta-things, but for me, it's such a fabulous recognition of all the efforts I have put in over the past few months. Especially as all my followers are actual human beings, my social media growth is 100% organic and this milestone has been reached in just two years without any gimmicks. Something that seems to be rare these days...
That's for the self-congratulating and slightly egocentric bit... Now, it's out of the way, we can move onto the more important topic of today's post: Gallery-style Art Walls.
I do love a salon-style display - that's the interior stylist's technical term for a gallery wall of artwork of various sizes, colours and types. It's a great way to display an existing collection of art in one place. For us, though the choice of salon layout wasn't so much aesthetic but mainly practical. The main wall in our sitting area is the widest I have ever had in my life (I am talking over 4 metres here) and I quickly realised that finding one single piece of art that wouldn't look like a post-it note had been forgotten on the wall was beyond challenging budget-wise. So I opted for a gallery wall with several framed artworks and affordable pieces mixed together in a cluster above the sofa. It's been quite popular on Instagram so I thought I'd share some tips on how to create your own at home. Obviously there are many ways to create, display and hang an instagram-worthy gallery wall but here are my 5 tips to create one that is perfectly imperfect, reflects your personality and won't cost the earth... You'll also find at the end of the post a sourcing list of all the artwork I used on my wall.
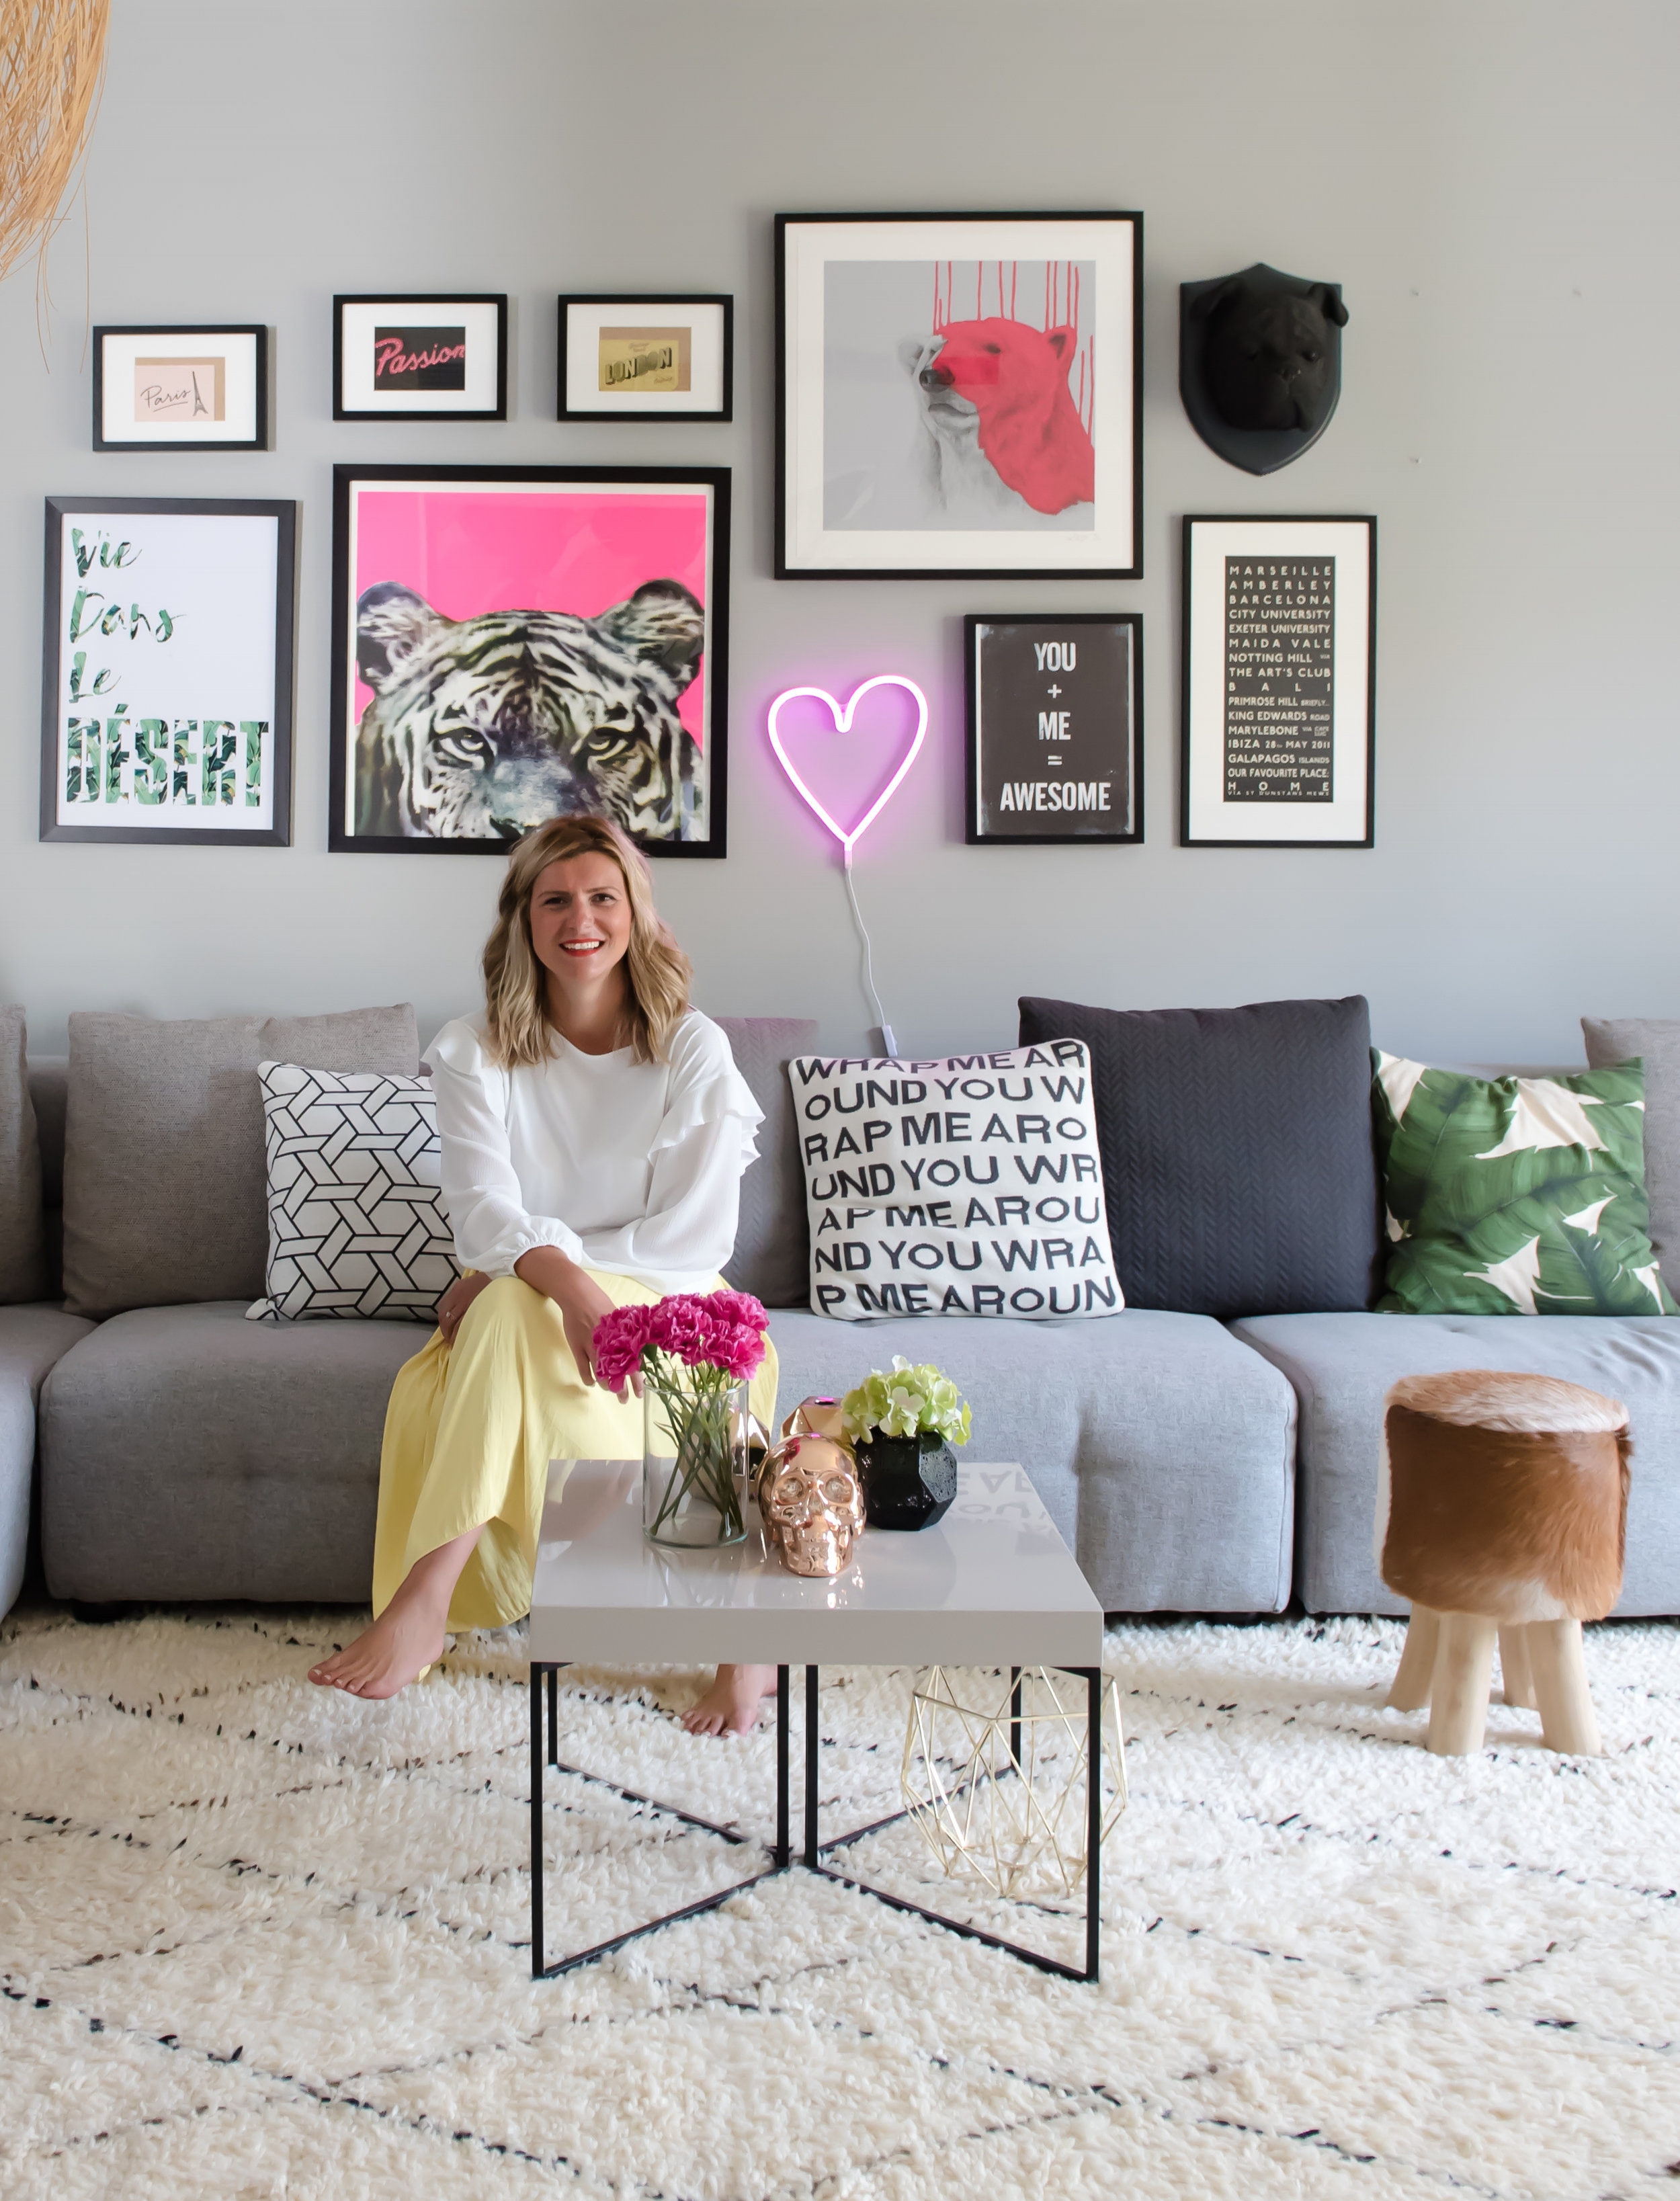
Yours truly, giddy as a goat, with my newly installed gallery wall... ((photography: Karen Wandrag from DesignK)
1. SOURCE THE ART
Obvious first step. Art can be a snobby topic, but for me the most important is to display in your own house whatever makes you happy rather what you think 'should' look cool. Think of it as an imaginary session with Marie Kondo: does that particular crazy, multicoloured, print 'spark joy in your heart' when you look at it? Does it make you feel all fuzzy inside even? Then it should bloody well be hung on your wall, that's all I am saying.
In the highly unlikely scenario that like me, most of your belongings and artwork still reside on another continent, you'll have to, like me, start shopping from scratch for artwork to populate your wall. And that's no easy feat. I found sourcing affordable art quite challenging since moving to Dubai so I did a bit of research and recently wrote a post about sourcing affordable art online. It's a good start if you have no idea where on earth to go...
I get so many clients asking me to find artwork for them and my first reaction is always, 'YOU have to chose what YOU like'. Obviously I facilitate the process for them and can make a preselection based on ideas they share with me, but at the end of the day, the stuff hanging on your walls should be a reflection of your personality, not mine.
2. GET YOUR FRAMING RIGHT
You really can't beat IKEA for affordable, decent-quality frames but sometimes it's quite limiting to have to fit your print to a frame especially as some of the more independent galleries might not stock standard sized prints. Personally, I usually get all my artwork framed by a local framer. It's not actually that much more expensive (it all depends on what type of frames you choose - I don't mind plastic!) and it means you can have your frames fit exactly your prints, choose the right mount and have it sealed at the back to protect your print from its environment. I also love the process, and going to pick them up when they're ready is one of those little things of interior styling that actually makes me happy...
3. IMPERFECT IS THE NEW PERFECT
This should be tip number one actually. Don't aim for perfection. The days of symmetrical, matchy-matchy interiors (and this goes for gallery walls) are long gone, people. These days the cool kids' pads are all about 'look what I have just thrown together in 5 minutes' kind of vibe, mega casual style that doesn't look overdone. So, forget colour schemes, have fun, be creative, let yourself go (metaphorically I mean...). Also think mixed media. Art doesn't necessarily have to be just framed prints or paintings. As you can see on my own wall, a funky neon light or an animal head can instantly lift your display from 'blah' to 'ta-da'! Same advice with sizes. I always stay away from same-size arrangements: I find them a bit dull and actually harder to put together as you have to source artwork with predetermined filters of sizes, orientation which takes away the freedom and fun of point number 1.
4. LAYOUT (AND PREP) IS KEY
Organic, asymmetrical-looking arrangement doesn't mean chaos. If you are a bit nervous about drilling a million holes in your wall and like me, have mild OCD, or simply like to follow some rules, here are a few steps to get you going. Once all your art is framed, arrange it on the floor to see how much space it takes when grouped together. You can play around with the arrangement until you like the composition. When you're happy, step on a stool and take a few pictures from above, flatlay style, so you can recreate your composition on the wall. You can see how mine changed from the original version below. I like to start with larger pieces first and have these displayed in the centre and build from there with smaller pieces. As opposed to actual art galleries there are no strict rules on how high the frames should be hung, but as a rule of thumb, it should be at eye level. In terms of alignement, again no strict rules. I do like frames aligned from the bottom. But having a cloud looking cluster (where the centre of gravity is in the middle) can also look great. Finally, I recommend you leave at least 5 cm distance between your frames, vertically and horizontally. I usually leave 7cm even. If you rent and are worried about drilling, then let me introduce you to the genius idea that is Command Strips.... Available from your local DYI store... It's kind of life changing...
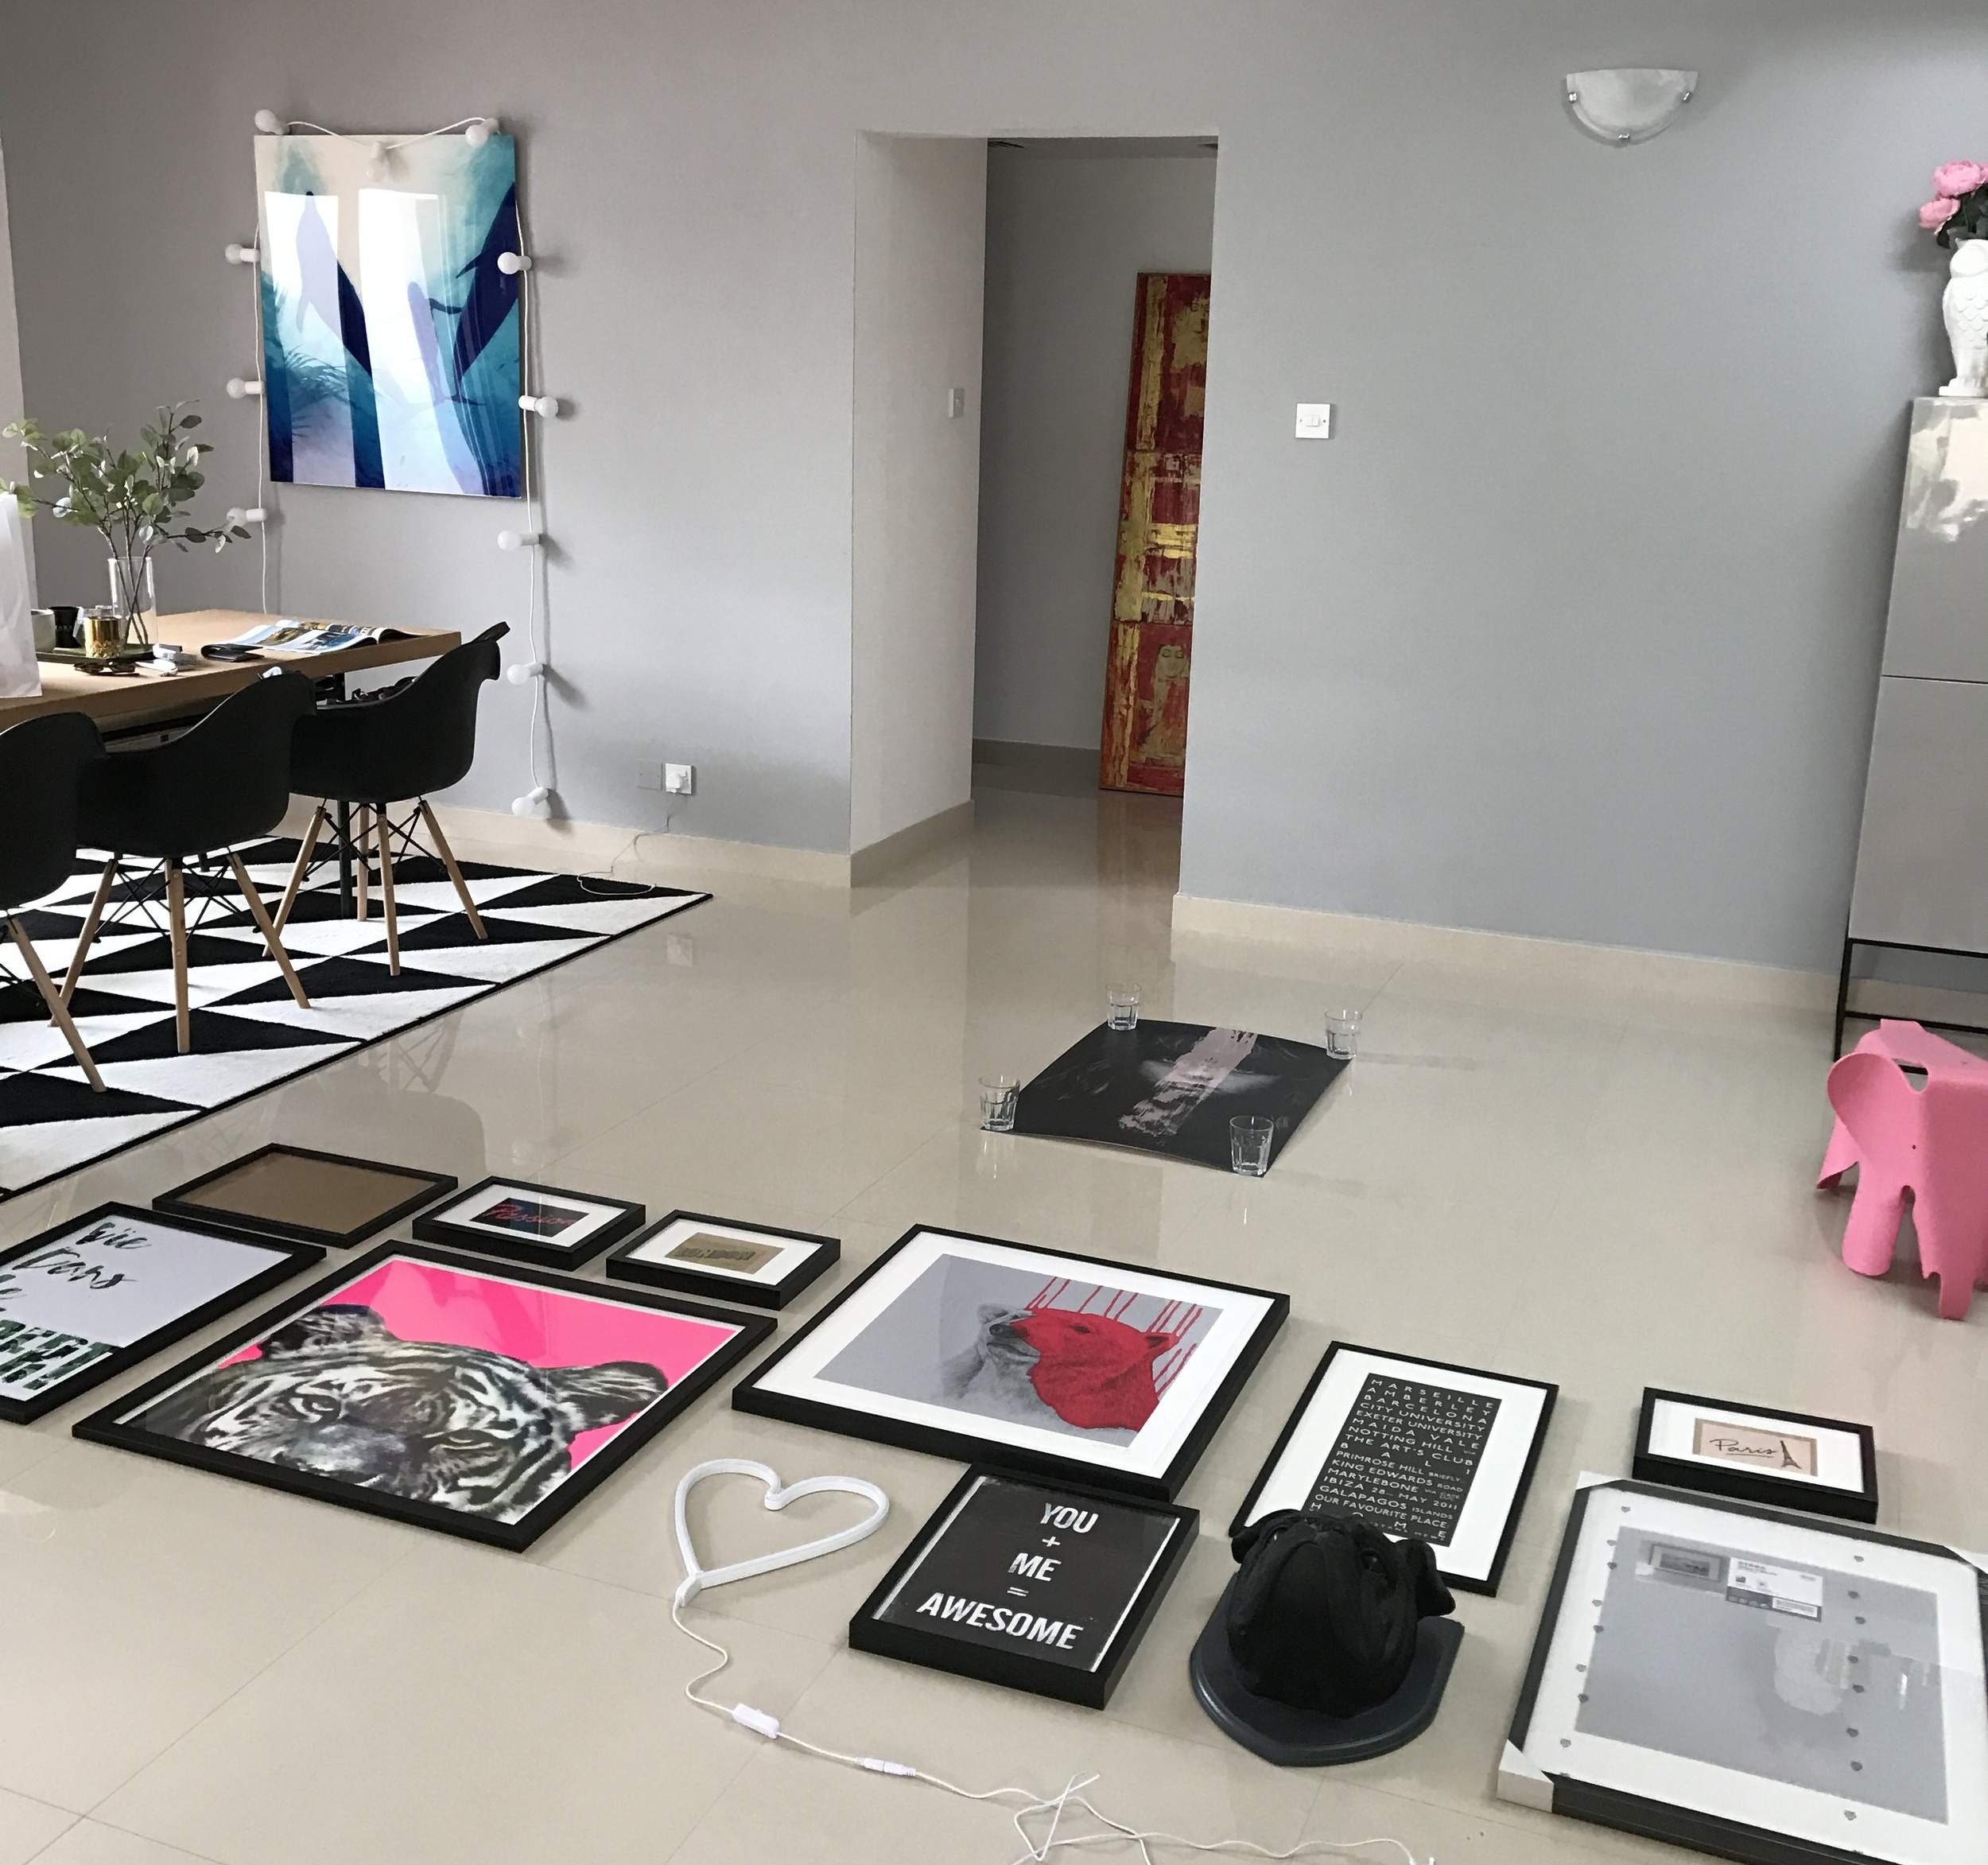
Preparation is key even when aiming for imperfection, so laying out your gallery on the floor first is a good way to visualise how it will look hung... and you can make changes before drilling.
5. KEEP IT AS A WORK IN PROGRESS
I do like to think of a gallery wall as something organic that has room to grow rather than static. I guess working in interiors, I am never truly satisfied with anything especially in my own pad and I tend to keep changing things around. It's the same with artwork. I like to swap stuff around, finding new pieces and adding them to the mix. The beauty of having an imperfect, organic wall arrangement with no symmetry is that you can keep adding as you go (well until you run out of wall that is!). For me it's a great way of avoiding those annoying conversation with Mr Stella + the Stars... Me: "Ohmagod, ohmagod, ohmagod, I LOOOOOVE this print. I HAVE to have it, like yesterday!" to which the answer used to be: "Yes it looks great and it's so you but where will it go?!". Well, not anymore!
BONUS TIP: DELEGATE
DYI in our house is a source of many marital arguments (which usually border on divorce proceedings), not to mention the fact that both Mr Stella + the Stars and myself are totally hopeless when it comes to DIY so I learned a long time ago that delegating to the experts is key when getting sh*t done around the house.
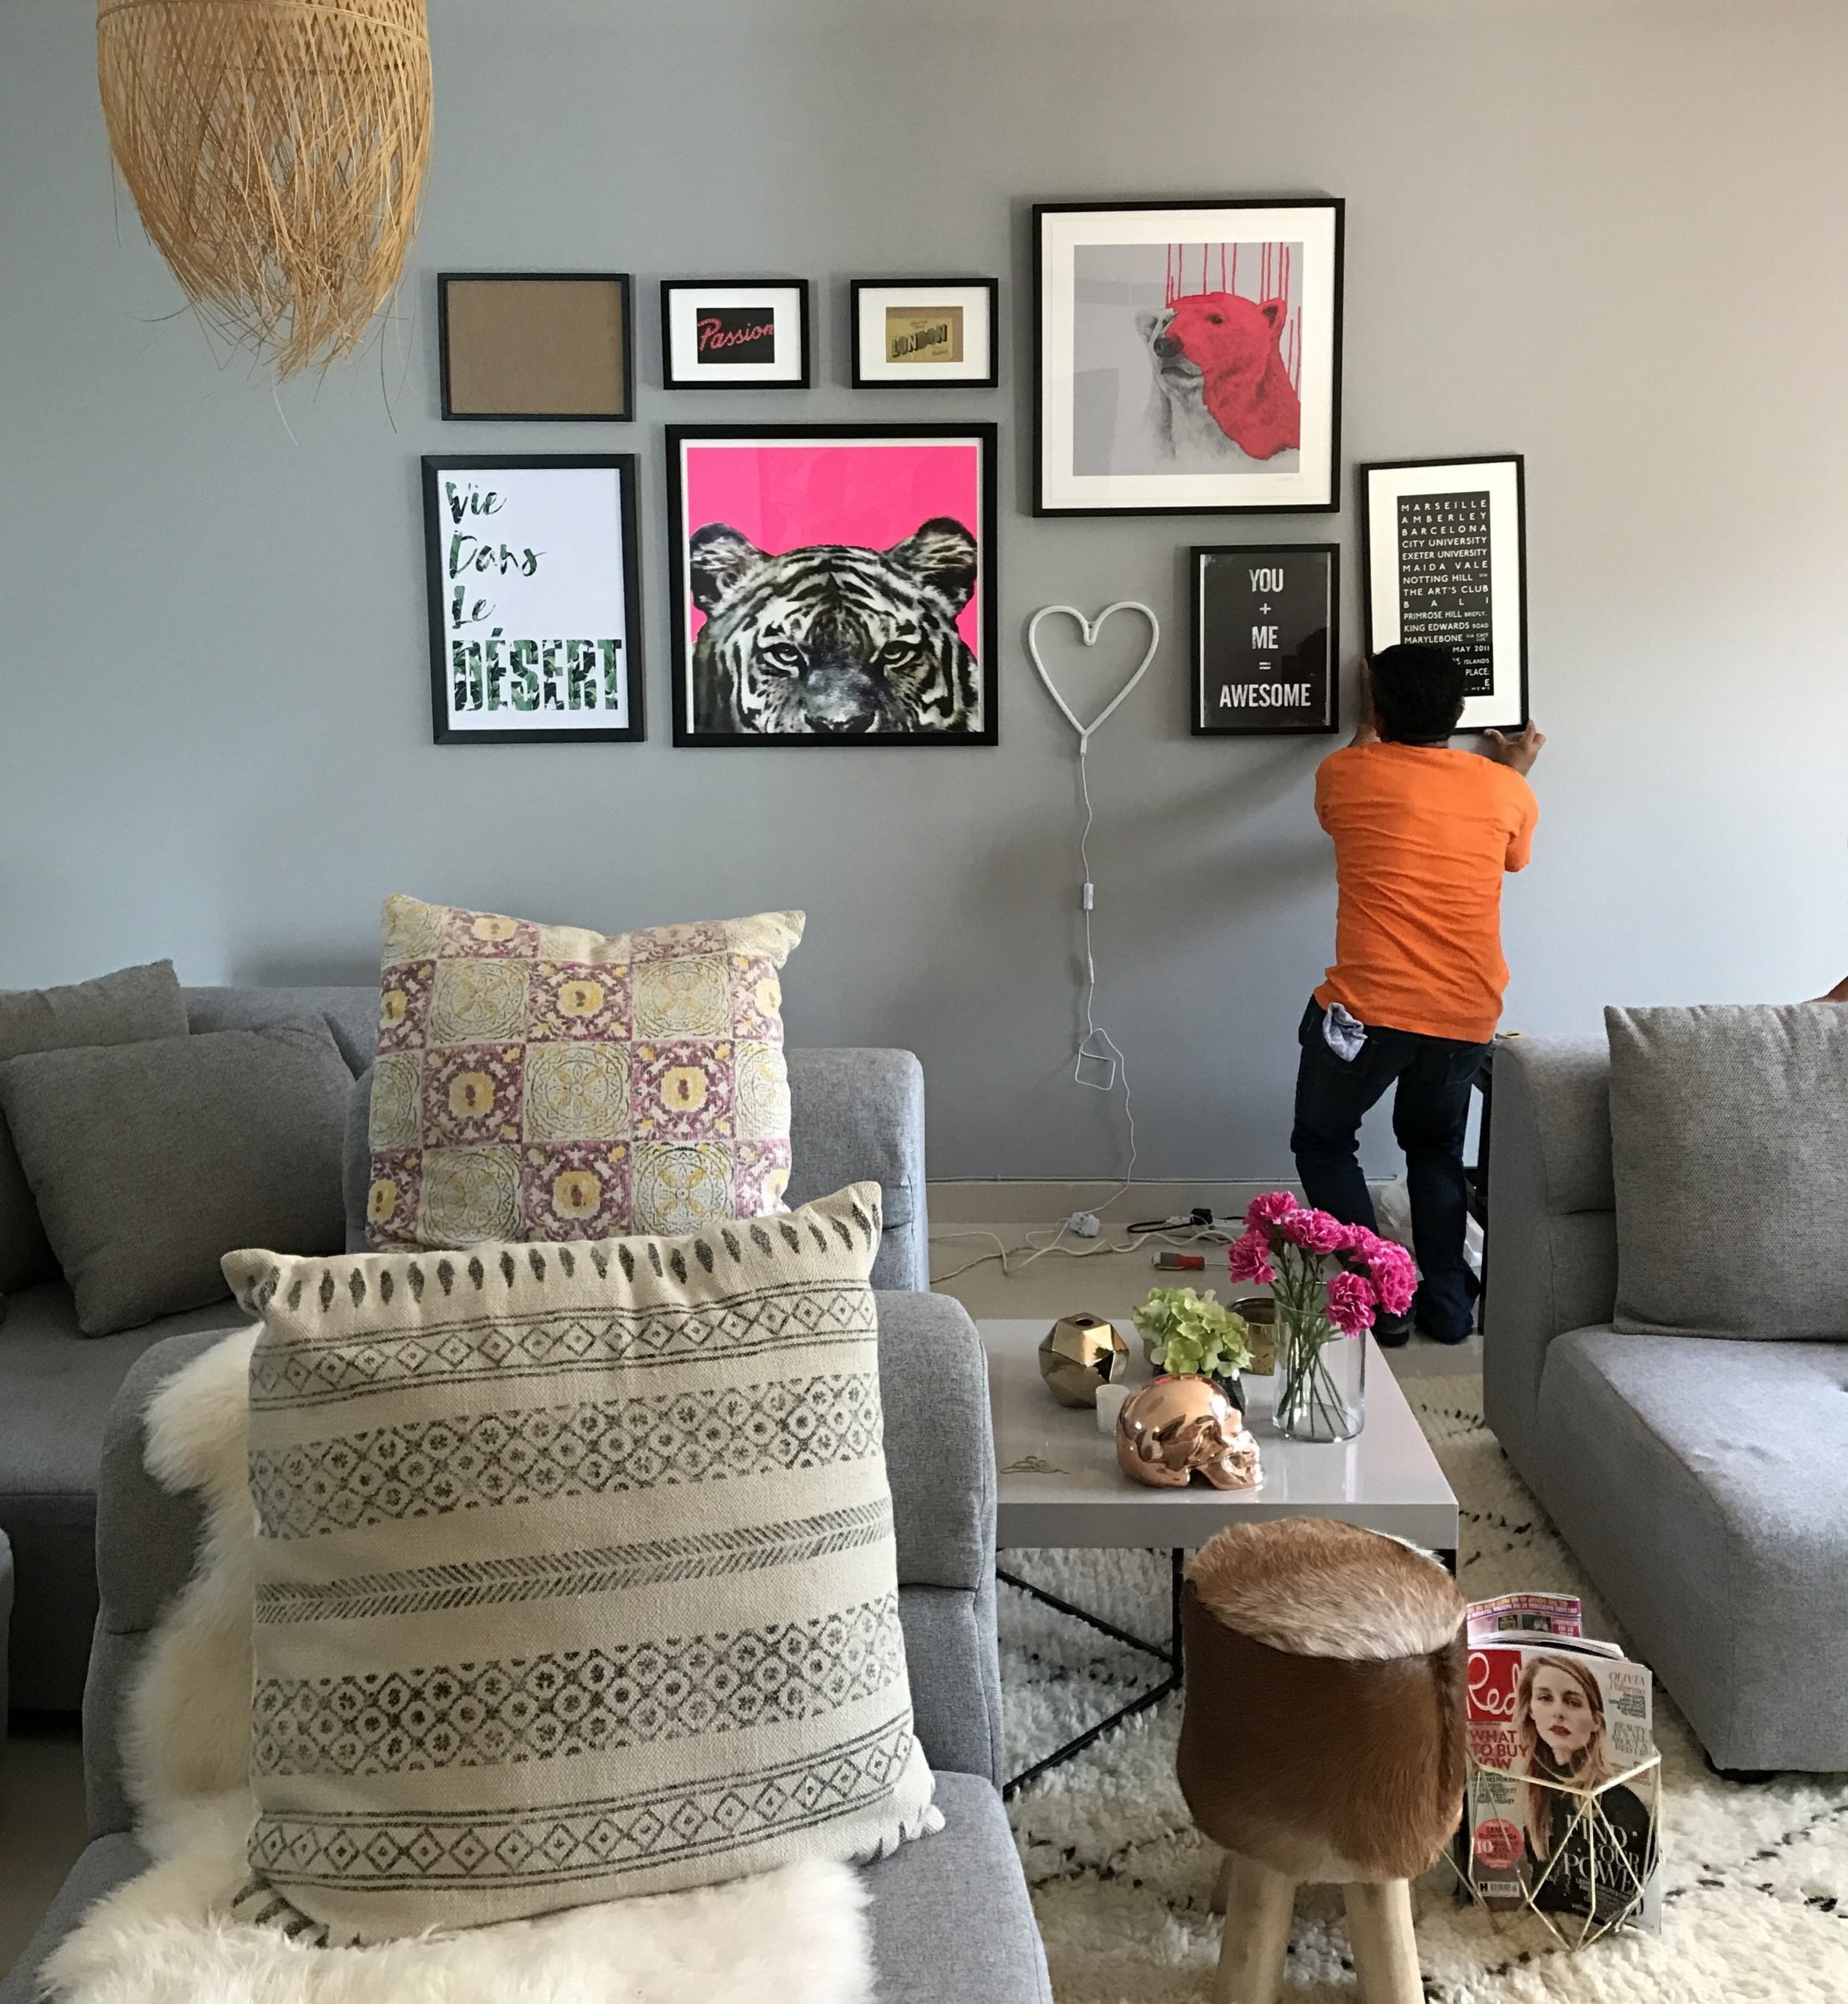
At Stella + the Stars, a trusted handyman (see here in action) is key to a successfully installed gallery wall (and a happy marriage).
Now if you like the gorgeous stuff I added to our living room wall, here is where you can find every piece.
- 'Vie dans le desert' print in banana leaves. Custom made by the lovely Steve at North 6 Graphic Design.
- Neon pink tiger head print: 'Into the Lion's Den' by artist Aida Wilde, available from Nelly Duff Gallery.
- Neon Heart light in pink: from A Little Lovely Company, available from Caramel & Sun
- 'Hey There Polar Bear' limited print by Louise McNaught, available from RiseArt.
- 'You + Me = Awesome' print, available from Etsy.
- Black bulldog animal head, from Abigail Ahern for Debenhams. Unfortunately discontinued. Click here for the new collection for similar designs.